
Composite Decking Installation Guidelines
Composite decking has unique characteristics and requires specific fixing requirements that differ from timber. We strongly recommend that these guidelines are read thoroughly before commencing the design and construction of a deck using CleverDeck composite decking.
Quicklinks
- Storage
- Breaker Boards
- Screw Fixing
- Nail Fixing
- Safety and Tools
- Colour and Orientation
- Spacing
- Foundation and Sub-structure
- Fastening
- Domestic Fixing Specifications
- Starting, Finishing & Fascia Boards
- NewTech Deck Clips and AWC
CleverDeck composite decking must be stored flat and dry and off the ground. Standard 5.4 metre long packs of CleverDeck require a minimum of seven gluts (supports) under the pack for proper storage.
Take care when handling CleverDeck as the boards are finished and ready to use and rough handling might cause visible scratches and marks on the deck boards.
As with any building project you should ensure that the correct tools and proper protective equipment are being used. It is the responsibility of the user to follow safe practices when using any tools during the installation process. Remember that CleverDeck composite decking is heavier than most traditional timbers and should be lifted and carried with care.
CleverDeck composite decking can be drilled, cut, fastened or routed with normal woodworking tools.
The composition of CleverDeck WPC decking includes rice husks and the abrasive nature of this material means that cutting tools will lose their edge more quickly. We recommend using sharp carbide tipped cutting tools. Saw blades should be a minimum of 40 teeth
Foundation and Sub-structure & Coverage (Refer diagram A)
CleverDeck composite decking cannot be used as a component of the foundation or substructure.
When constructing the substructure care must be taken to ensure that the joists are level, straight and square as CleverDeck decking will conform to the level and orientation of the joists.
An allowance of 3-4mm fall per metre of deck in the direction away from the structure should be made to aid water run-off and reduce the likelihood of water puddling that will cause water staining particularly when the boards are new.
Boards fixed across the deck at angles other than 90 degrees to the joists require closer joist spacing.
Check the fixings specifications table on page 5 to make sure that you have the correct spacing between the joists. As a general rule the closer the joists the better the deck.
The 138mm wide CleverDeck board combined with the NewTech deck clip provides a cover of 143mm or 7 boards per lineal metre. The 86mm board combined with the NewTech deck clip provides a cover of 91mm or 11 boards per lineal metre.
Additional joists will be required where breaker boards are used in the deck design. Read through the section below referring to breaker boards and determine your deck design before you calculate how many joists will be required for the deck.
The decking boards can overhang the sub frame by up to 50mm in length. There should be no overhang over the width of the decking boards (other than when the decking sits over the top of a facia board in which case an allowance for the width of a facia board that will sit up underneath the decking board should be made). Consideration should be given to the overall deck size and the number of boards required to cover the deck.
You can start from the inner or outer edge of the deck depending on whether you are using full boards or whether you need to cut the board which is normally against a wall of an existing structure. The deck boards will be installed across the deck and the finishing board may need to be trimmed in order to line up with the joists or if working to full width boards the joists may be cantilevered and trimmed back to the full width finishing board. Due to normal manufacturing tolerances and the potential for a slight difference in spacing between deck boards we do not recommend trying to pre-determine the width of the final board (the outer board must finish flush with the joist or facia board). Any cut outs around protrusions such as veranda posts or balustrades need to be fully supported.
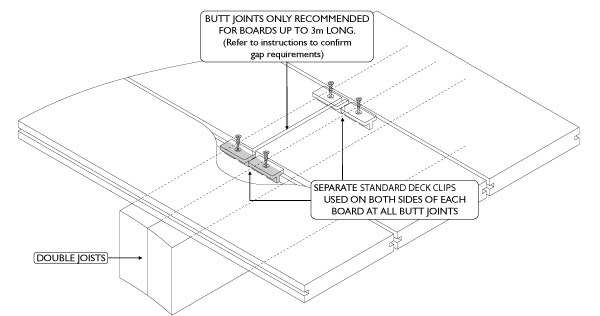
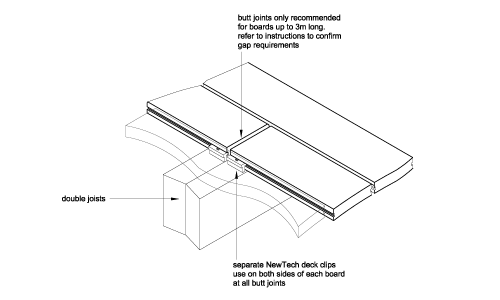
Butt joins should only occur over a double joist.
CleverDeck composite decking should not be attached directly to any solid surface or watertight flooring system, such as concrete, brick or tiled patios, waterproof membranes or roofing (treated timber or steel battens are required for fixing CleverDeck over concrete, contact Futurewood for further information). Good ventilation is a necessary requirement for your deck. The Standard NewTech Deck clips provide a 5.5mm gap between each CleverDeck composite decking board. 300mm clearance is required between the boards and the surface beneath the deck. Do not seal off deck ends, the airflow should be unobstructed and any water should be able to drain away freely.
The area under the deck should be dry and clear of vegetation. Drainage will be required if the ground below the deck typically holds water.
Failure to correctly install your CleverDeck composite decking may void your warranty.
Diagram A
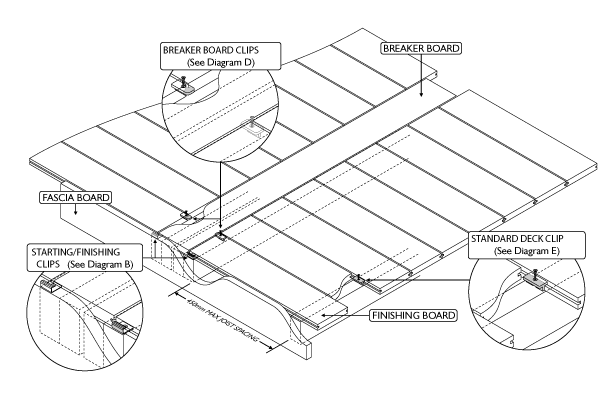
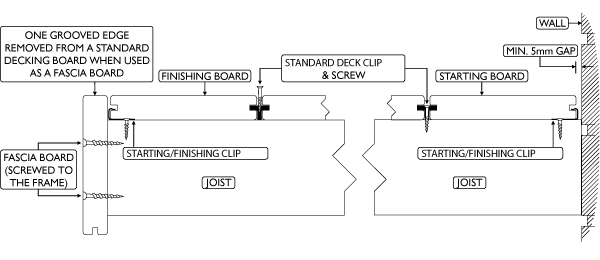
Starting, Finishing & Fascia Boards (Refer diagram B)
The first board laid on your deck is referred to as the starting board and will normally be installed with one “free” edge typically gapped against the side of a wall/structure or at the outside edge of the deck.
As the starting board can only be fixed via the NewTech deck clip on the inner edge we recommend using the NewTech Starter/Finishing (S/F) clip to secure the starting board. The S/F clip should be positioned 3mm from the outer edge of the deck joists at 900mm intervals (every 2nd joist). Screw the S/F clips to the joists then push the starting board in to the clip at a slight angle (about 30 degrees) so that the groove in the board edge engages fully with the clip. A right angle bracket under the deck fixed to the joist and then screwed up through the bracket in to the underside of the board can also be used in place of an S/F clip if you have adequate access under the deck.
If the outer edge of the deck board is going to be visible and you do not want to see the S/F clip or the groove on the edge of the board then you will need to use a right angle bracket to fix this board and the groove can be removed via sawing. Alternatively you can use one of the deck boards or a Futurewood Enviroslat board as a facia board and remove the groove with a saw and position this level with the height of the deck boards to hide the S/F clip and the groove in the outer deck board (as shown in diagram A and B).
Before screwing down the deck clips on your starting board make sure that you place your next (second) deck board over the deck clips so that both edges of the deck clip are concealed (inside the outer groove of the starting board and the inner groove of the second board).
The finishing or last board should be treated in the same way as the starting board. The width of the finishing board can be reduced as required by sawing so that it remains supported across it’s width by the joists and/or facia board. Grooves can be cut in to the board edge using a router or biscuit cutter or similar to allow starting or finishing clips to be used on this cut board edge. CleverDeck decking boards make ideal facia boards.
When using CleverDeck boards as Facia boards they should be screwed (pre-drill and countersink all screws) at a maximum of 900mm centres to an appropriate frame fixed to the sub frame.
When using the CleverDeck board as a facia board the groove can be removed as required.
Diagram B
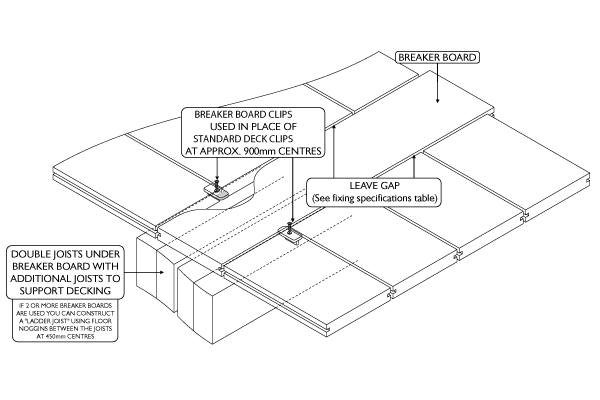
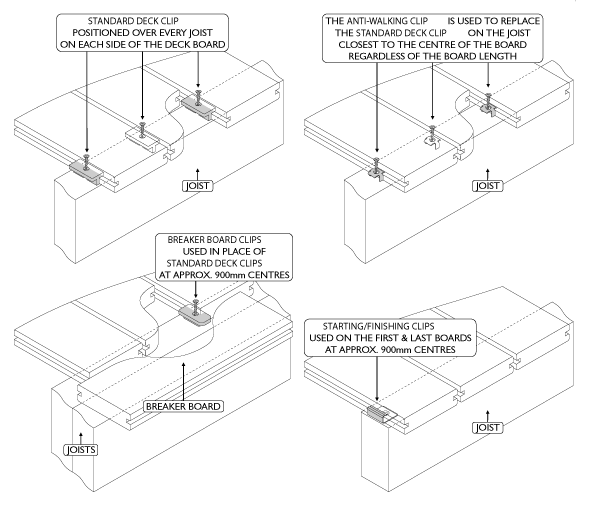
Breaker Boards (Refer diagrams C and D)
Because CleverDeck composite decking comes in standard 5.4 metre long lengths the preferred method of installation is to use a breaker board rather than having a number of randomly spaced butt joins spread across the deck. Depending on your overall deck size/shape you may need to allow for the inclusion of one or more breaker boards in the design of your deck. The incorporation of the breaker board can greatly enhance the character and appearance of your deck as well as allowing you to use potential off cuts (helping to minimise overall board wastage). Additional joists will be required in your sub floor construction to fully support the breaker boards wherever they are being used.
Running long boards with a butt join may result in a gap of more than 10mm once the boards have cooled and contracted. If staggered butt joins are to be used we recommend that you contact Futurewood to discuss your specific fixing options.
Breaker boards should be fixed using the breaker board clip. Breaker board clips are positioned at the end of the deck boards where they meet the edge of the breaker board. A breaker board clip should be used in place of a regular deck board clip at every 2nd joist (typically 900mm spacings) on both sides of the breaker board.
The breaker boards should be left loose and pushed back in between the regular deck boards then the breaker board can be placed in position and the breaker board clips can be pushed against the breaker board so that he nose of the clip engages in the groove of the breaker board before driving home the screw.
We recommend that any breaker boards, whether they are butted together or are a single board do not exceed 3 metres in length (e.g. a 5.4 metre board would be cut in half producing 2 x 2.7 metre boards). The butt joins between these boards should be gapped according to the table on page 9. This will help to minimise the potential for an excessive gap developing at the butt join between the breaker boards or for a single breaker board to expand beyond the side of the deck.
Diagram C
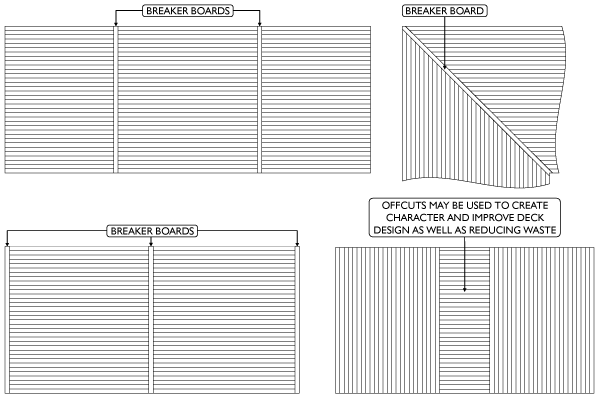
Diagram D
The natural fibres used in the manufacture of CleverDeck composite decking allow some colour variation between boards and will enable the overall colour to lighten, creating a weathered colour effect over time. Allow 8-12 weeks of full exposure to sunlight in order for the majority of the colour weathering to occur.
The grain of CleverDeck composite decking will reflect light differently depending on the orientation of the boards. To ensure the same look across the deck it is necessary to run all deck boards in the same direction as the grain.
The NewTech Deck Clip System has been specifically designed for fixing CleverDeck boards and provides the added value appearance of a concealed fix while saving time and money on the installation of the deck therefore it is highly recommended to use NewTech Deck Clips & screws when installing CleverDeck composite decking.
Most NewTech Deck Clips are supplied with blackened stainless steel screws for either timber or steel joists. Starting/Finishing clips come with plain stainless steel screws for timber joists and BAL clips are supplied without screws
Make sure that you specify the correct clips based on the table below;
| Part Number | Quantity & Type | Screws forJoist Type | Coverage based on 450mm joist centres | |
|---|---|---|---|---|
| using 86mmwide boards | using 138mmwide boards | |||
| FNTDCT115 { | 100 deck clips | Timber | 4 square metres | 6 square metres |
| 15 anti-walking clips | Timber/Metal* | |||
| FNTDCM115 { | 100 deck clips | Metal | 4 square metres | 6 square metres |
| 15 anti-walking clips | Timber/Metal* | |||
| FNTDCT690 { | 600 deck clips | Timber | 24 square metres | 36 square metres |
| 90 anti-walking clips | Timber/Metal* | |||
| FNTDCM690 { | 600 deck clips | Metal | 24 square metres | 36 square metres |
| 90 anti-walking clips | Timber/Metal* | |||
| FNTDCSF20 | 20 starting/finishing clips | Timber | 3 x 5.4 metre deck boards | 3 x 5.4 metre deckboards |
| FNTDCBB10 | 10 breaker board clips | Timber/Metal* | 1 x 5.4 metre breaker board | 1 x 5.4 metre breakerboard |
| FNTDCAWTS50 | 50 anti-walking clips | Timber/Metal* | may be required if there are a large number ofshort boards in the deck design | |
| FNTDCBAL100 | 100 BAL clips | no screws provided | 3.5 square metres | 5.5 square metres |
NewTech Deck Clips and AWC (Refer diagram E)
NewTech Deck Clips and Anti Walking Clips (AWC) provide you the added value appearance of a concealed fix and save you time and money with the installation of your deck.
NewTech Deck Clips should be used at each joist regardless of joist spacing. When using NewTech Deck Clips the first (starting board) and the last (finishing board) need to be fastened using screws through the top of the board or screws/brackets from underneath the boards as as the deck clips will only be holding one side of the board.
One AWC should be used in place of the NewTech deck clip on either side of every board, at the joist that is closest to the centre of each board, regardless of board length. The AWC will help to prevent the board from creeping or “walking” along the deck when it is expanding or contracting. AWC’s come with a screw for fixing to timber joists. The AWC can be used on steel joists using the timber fixing screw by pre-drilling a 3mm diameter hole. Before you drive the screw home ensure that that the tip of the screw sits proud of the deck clip and is located in the pre drilled hole then apply low speed and minimum torque to just “nip” up the screw in the clip. Over tightening will result in the screw spinning out and stripping its thread.
NewTech Deck Clips and AWC should be loosely positioned in the groove of the deck board over each joist before sliding the next board in to position. Once the starter board is aligned and fixed in position you can prepare up to 5-10 boards (depending on the width of the boards used) pushed together with deck clips in position over each joist. Use a lever to apply force against the last board you are fixing in the “set” and a string line to ensure that the board is straight and true and then fix the set in place by screwing down the deck clips on the inside of the outer board (the last row of deck clips that have a board on either side of them). Make sure that the deck clips are evenly spaced over the joists before fixing them. Once the outer board is secure you can screw down all of the deck clips between the other boards. Repeat this process until you reach the finishing board.
Diagram E
When fixing a butt joint use a separate deck clip on both sides of each deck board (refer diagram F).
Drivers should be adjusted to a low or medium torque setting when fixing the NewTech Deck Clips to ensure that the screws are not “over driven” in to the clips.
Additional care must be taken when fixing the NewTech Deck Clips to steel joists to ensure the screws cut properly and to reduce the risk of the driver or screws stripping.
We recommend that a slow speed and minimal force is used to drive the screw through the clip until it is touching the steel. At this point the speed of the driver should be increased to approximately 1000rpm to allow the cutting edge on the screw to cut through the steel. Too much pressure or too little speed may cause the screw to go off line and will strip out the screw head and or the driver. Once the screw has cut through the steel any pressure on the driver should be reduced immediately to stop the screw from driving through the clip.
NewTech Deck Clips provide an automatic spacing of 5.5mm (+/- manufacturing tolerances) between each board which is the minimum recommended installation requirement to allow adequate air flow between each board.
NewTech Deck Clips provide the best fixing option for CleverDeck composite decking as they allow the decking to “work” with the deck clip maintaining independent expansion and contraction between the decking boards and the joists. This independent fixing method virtually eliminates the pressure build up on the fastenings that can occur when the decking is fastened directly to joists. This independent movement is critical when fixing longer length boards of CleverDeck to steel joists. This independent movement is critical when fixing longer length boards of CleverDeck to steel joists.
Screw fixing is generally not needed or recommendedhowever if there is a need to screw fix some boards on yourdeck please note the following instructions.
Pre-drilling and countersinking is essential in order to reduce the risk of splitting when screwing directly in to the face of the CleverDeck composite decking. A minimum screw length of
60mm is required. When fixing a butt joint two screws are required to be positioned 25mm from the outside edge of each board and a minimum of 25mm from the end of each board. Drivers should be adjusted to a low or medium torque setting when fixing screws in to CleverDeck composite decking. Screws should not be “over driven” in to the decking.
Screw fixing directly through the CleverDeck board is not recommended on steel joists when the board length is over 3 metres due to the different expansion and contraction characteristics of the two materials.
Nailing is not recommended.
CleverDeck composite decking expands and contracts lengthways due to changes in temperature (there is minimal change to the width of the board). It is critical to have an understanding of the board temperature as boards cut at different temperatures will affect the appearance of the finished deck.
The longer the board the greater the potential for a change in length due to temperature change. All boards must be the same temperature during the installation process (measuring
& cutting). The boards should be kept in the shade so that each board is a similar temperature. If there is no shade on the site make sure that all measuring and cutting is done in the morning when the boards are still cool from the previous night. Once the boards are exposed to direct sunlight they will absorb radiant heat and increase in length.
A 5.4 metre long board will grow in length by approximately 2.5mm for every 10 degrees Celsius increase in temperature. The board will contract in length by the same amount when the temperature of the board cools.
Even on a day of mild temperatures and minimum temperature change the boards may vary in temperature by 25° Celsius or more if moved between direct sunlight and shade.
Boards should always be measured/cut/installed at cooler ambient temperatures (below 30 degrees Celsius). Therefore in summer months and tropical areas installation should occur in the morning.
Butt joins are not recommended but if they have to be used the boards should be less than 3 metres in length (as is the case with the length of the breaker boards). A 4mm gap should be left to allow for expansion when installing the boards at recommended temperatures. Butt joins should always occur over a double joist or cleat (minimum 90mm x 45mm) to allow for the use of a deck clip and screw at the ends of each board (4 Standard NewTech Deck Clips are required -2 deck clips per side per butt join). It is highly recommended that boards over 3 metres in length are not butted end to end (this applies for either a continuous run of boards or an angled or mitred join). Running long boards with a butt join may result in a gap of more than 10mm once the boards have cooled and contracted. The preferred method of deck design is to use a breaker board (refer to the breaker board fixing information above). Other fixing options might be applicable if numerous butt joins are required. Please contact Futurewood for information regarding alternative butt joining options.
A 5mm to 7mm gap is required around posts or other protrusions in the decking. As mentioned in the substructure information any protrusions should have joists fitted around them so that the end gaps can be fully supported.
Diagram F
CleverDeck Composite Decking Domestic Fixing Specifications
| Description | Size |
|---|---|
| Maximum joist distance (centre to centre) laid at 90 ° to the joist | 450mm* |
| Maximum joist distance (centre to centre) laid at 60 ° to the joist | 400mm* |
| Maximum joist distance (centre to centre) laid at 45 ° to the joist | 350mm* |
| Maximum joist distance (centre to centre) laid at 30 ° to the joist | 250mm* |
| Maximum stringer spacing for stairs (centre to centre) (Note: Stair installation using CleverDeck should always include a riser board) | 300mm |
| Minimum ground Clearance | 300mm** |
| Minimum spacing between boards (side to side) | 5mm |
| Minimum spacing at end of boards (abutting a wall) | 5mm |
| Minimum spacing from boards running parallel to a side wall | 5mm |
| Maximum overhang of boards past supporting joist(applies to length only width must be supported) | 50mm |
| Spacing required for butt joins in the deck(for boards up to 3 metres long) | 4mm |
| Spacing required where boards meet protrusions in the deck(for boards up to 3 metres long) | 5mm |
| Spacing required where boards meet protrusions in the deck(for boards over 3 metres long) | 7mm |
| Minimum spacing for screw fixings from the edge of the board | 25mm |
| Space between butt end and breaker board | 2–7mm*** |
*Maximum recommended centre-to-centre spans using a minimum of three joists. Closer joist spacings will improve the overall quality and performance of the deck. A joist spacing of 400mm will improve the deck’s performance and a joist spacing of 300mm will give better performance again.
** Contact Futurewood for information relating to batten fixing over concrete where the minimum ground clearance may be less than 300mm.
*** Will depend on geographical region, installed temperature and likely temperature change over the year.
CleverDeck composite decking must not be applied directly to a solid surface.
Commercial installations will need to be assessed on a case by case basis.
Fixing details and specifications may change without notice.
For further information regarding your CleverDeck decking please Contact Futurewood
Click below to find out more or contact us on: John Carroll 0414301515 and Colin Carroll 0421273887
Email for a price or more information: John@carrollswholesale.com, Colin@carrollswholesale.com